Connect your AI
Every client connects to the same endpoint, but the menus and account requirements differ. Find your AI below and follow its steps. You can connect more than one.
About 5 minutes per client
Every AI client connects to the same address:
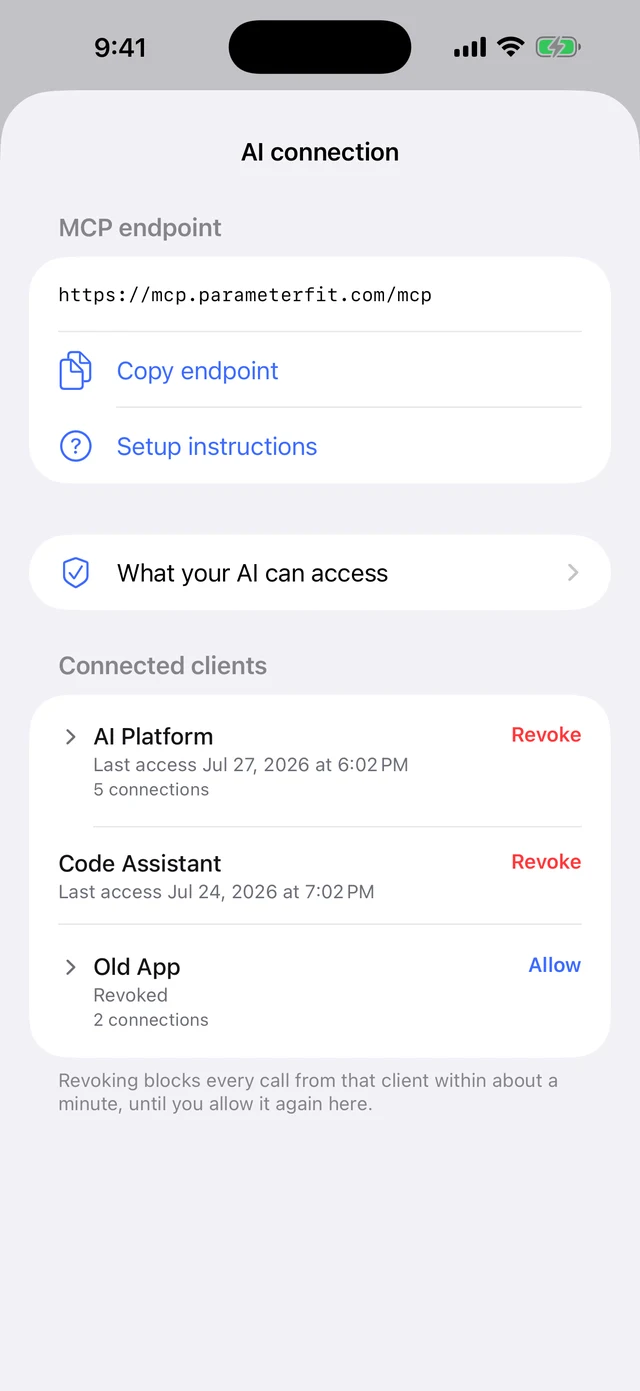
https://mcp.parameterfit.com/mcp
The same URL, with setup instructions, lives in the app under Settings, AI Connection, Setup instructions. It appears after a one-time consent screen that spells out exactly what a connected AI can read and change. The AI Connection is the app’s one paid feature; the 14-day trial covers it.
How the sign-in works, for every client
Whichever client you use, adding the connector ends the same way: a sign-in window opens and Apple asks you to sign in to iCloud. Two things matter there.
- Use the same Apple account as the iPhone where Parameter is installed. That account is where your data lives; a different one connects your AI to an empty database.
- Check “Keep me signed in.” With it, the connection lasts weeks; without it, about half an hour. If the connection goes quiet for a couple of weeks, the client will simply ask you to sign in again.
The sign-in happens on Apple’s page. Parameter never sees your Apple ID password.
Claude
Claude’s free plan allows one custom connector; paid plans allow more. Set it up once on the web or desktop app; it follows your account to Claude on iOS and Android.
- Copy the endpoint URL above.
- In Claude on the web or desktop, click your initials in the bottom-left corner, then Customize, then Connectors.
- Click Add custom connector. Name it Parameter, paste the URL into the server URL field, and click Add. Nothing else on the form is needed.
- A sign-in window opens: sign in with the same Apple account as your phone and check “Keep me signed in.”
- In any chat, click the + button at the lower left, choose Connectors, and switch Parameter on.
- Try it: “Read my workout profile and plan my week.”
Claude also lets you set a permission per tool (always allow, ask each time, or deny). See “Tool permissions” below.
ChatGPT
Custom connectors in ChatGPT live behind Developer mode. Set it up at chatgpt.com; the connector belongs to your account, and works in ChatGPT’s desktop and mobile apps wherever OpenAI currently allows developer-mode connectors.
- Copy the endpoint URL above.
- Open Settings, Apps & Connectors, Advanced settings, and turn on Developer mode.
- Back in Apps & Connectors, choose Create, name the connector Parameter, paste the URL, and save.
- Sign in with the same Apple account as your phone and check “Keep me signed in.”
- In a chat, tap + in the message box, choose Developer mode, and enable Parameter for that conversation.
- Try it: “Read my workout profile and plan my week.”
Perplexity
This client’s setup screens haven’t been independently verified against the steps below; the general shape should hold, but menu names may have moved by the time you get there.
Perplexity added custom remote connectors in early 2026, on paid plans (Pro, Max, or Enterprise).
- Copy the endpoint URL above.
- Open Account settings, Connectors, then click + Custom connector at the top right.
- Choose Remote. Name it Parameter, paste the URL as the MCP server URL, pick OAuth for authentication and Streamable HTTP for transport.
- Tick the acknowledgement box and click Add, then click the new Parameter card to run the sign-in. Use the same Apple account as your phone.
- Try it: “Read my workout profile and plan my week.”
Microsoft Copilot
Unverified beyond the general flow: this path runs through Copilot Studio, which changes on its own schedule, separate from the consumer Copilot app.
The everyday Copilot app can’t take user-added MCP servers. Connections go through an agent built in Copilot Studio, on Microsoft 365 Copilot plans. If you just use the free Copilot app, pick one of the other clients instead.
- In Copilot Studio, open or create an agent, then Tools, Add a tool, New tool, Model Context Protocol.
- Paste the endpoint URL as the server URL (Streamable transport) and create the connection.
- Sign in with the same Apple account as your phone.
- Chat with that agent to read your profile and plan your week.
Google Gemini
Unverified for every account: the rollout described below is still in progress. Gemini’s consumer app gained bring-your-own-URL custom connectors in mid-2026. As of now it’s available to adult Gemini accounts in the US; the rollout hasn’t reached every account or region yet. If you don’t see the menu, that’s why.
- Copy the endpoint URL above.
- In the Gemini app or at gemini.google.com, open Settings, Connected Apps, then Add a custom app.
- Name it Parameter, paste the URL into the server URL field, and save.
- Sign in with the same Apple account as your phone.
- Turn Parameter on for a conversation, then try it: “Read my workout profile and plan my week.”
xAI Grok
Grok takes bring-your-own-URL connectors at grok.com. One setup covers the Grok web, iOS, and Android clients; it isn’t per-platform.
- Copy the endpoint URL above.
- At grok.com, open Connectors and add a custom connector.
- Name it Parameter, paste the URL, and save.
- Sign in with the same Apple account as your phone.
- Ask Grok to read your workout profile and plan your week.
Any other MCP client
Any client that supports remote MCP servers over streamable HTTP can connect. Look for “custom connector” or “MCP server” in its settings, give it the endpoint URL, and it walks you through the iCloud sign-in. Your data stays in your own iCloud; the connection reads and writes it on your behalf, and you can revoke any client in the app anytime.
Tool permissions, after you connect
Once connected, your client lists the individual tools Parameter exposes, and most clients (Claude included) let you set a permission per tool: always allow, ask each time, or deny.
Read-only tools: get_schema, get_profile, get_equipment,
get_current_plan, get_history, get_workout_log. Safe to set to always
allow. They can only look.
Write tools: push_plan, push_workout, update_workout,
delete_workout. Keep these on ask each time if you want to review plans
before they land. They can never touch your logs, profile, or equipment
either way.
Staying in control
The new-client notice
When a new AI client connects, Parameter flags it in Settings: “A new AI client connected to your workout data. Not you? Revoke it.” If you just set it up, dismiss it. If you didn’t, revoke it right there.
The connected-clients list
Settings, AI Connection lists every connected client with its last-access time. Revoke any of them; the block takes effect within about a minute and holds until you allow it again.
What any client can ever do
Read your profile, goals, equipment, and heart-rate zones; read your workout history and logs; create and update plans and workouts. It can never write your logs, your profile, or your equipment. The full scope is shown in the app before the endpoint is ever revealed, and again anytime under “What your AI can access.”